Showing posts with label D&D 5e. Show all posts

Tuesday, April 16, 2024

The Temple of Oblivion – Part 3: The Temple Ruins

<< Part 1

<< Part 2

The campaign began in 2016 as an ad hoc test of Roll20 and an introduction to 5th edition D&D for one of my long-time gaming friends. I never intended it to be a full-on campaign, but more people joined the "playtest" and before I knew it, we were gaming online every week. The party ballooned at one point to 7 players plus 3 NPCs, but by the end, after a series of interpersonal conflicts/meltdowns between some of the players (and, in one instance, between myself and one of the players), the group had shrunk to 3 PCs plus 3 NPC followers. 

Most of the first half of the campaign was fairly free-wheeling, with several different, mostly unrelated adventures. By the second half, however, the party had discovered an evil idol with a curse, and became the quarry of a trio of mind flayers who were after the idol. The curse prevented the party from simply throwing the idol away (it reappeared among their belongings the next day), and also served as a psychic "homing beacon" for the mind flayers as they pursued the party.

The mind flayers already possessed one of the idols after the players missed an opportunity to retrieve it, and were actively using it to summon other aberrations from their alien realm. Working through their human proxies—the Cult of Khoss—the mind flayers harried the party across my campaign world, with the PCs barely staying one step ahead of their pursuers. 

The party discovered the hidden location of a third idol (of three needed to open a dimensional portal), but a moment of carelessness caused one player's NPC follower to fall into the clutches of the cultists, who sussed out the idol's location and secretly implanted the NPC with an intellect devourer (a fact the party never discovered until it was too late). The compromised NPC was allowed to be "rescued," and he rejoined the party as an unwitting and unaware mole.

The party raced the cultists to find the third idol, but failed. As part of that failure—to the players' utter horror—the intellect devourer burst from the NPC's skull, killing him instantly. (Regrettably, this was one of my finest DM moments as the NPC was popular with the players and his grisly death really caught everyone off guard). The loss was even more painful because one of the players had innocently put the NPC in a position to be captured in the first place.

Having gained sufficient levels to take on the enemy, imbued with a burning desire for revenge, and gifted with some inside knowledge from rebel cultists seeking release from their thralldom to the mind flayers, the party decided to end their constant harassment by attacking the source.

Thusly, they came to these ruins and made their way through the secret entrance to the temple complex. Originally, these ruins were intended to be the setting for several low-to-mid-level dungeons, including parts of the Caverns of Thracia, but the party didn't glom on to the site early in the campaign, so I repurposed it for the high-level conclusion instead. The climactic battle would take place within the Temple of Oblivion, where the party would confront the mind flayers who needed all three idols to open the dimensional portal and bring through their elder brain master.

By this point, we were all feeling a bit fatigued. We were more than 110 sessions in when the party made it through the secret entrance shrines, and I was definitely ready to wrap up the campaign and move on to something new. So, I presented the players with a choice of entrances into the pyramidal complex via one of the two smaller pyramids. I then roughed out two gantlet-style point-crawls, rather than developing full-on dungeon levels that might have taken the players another 15–20 sessions (or more) to get through. 

One pyramid was already opened by the mind flayers and full of their thralls. This was a route that was "cleared," but difficult to sneak through without getting noticed. The other pyramid was still sealed and could be opened with the idol the party possessed, but it would require them to overcome the monsters and perils present in the point-crawl dungeon.

They chose to navigate the unopened pyramid (the Temple of Death), so I designed a dozen or so encounters and a path with several detours so as to not make it a completely linear experience. Success in certain areas made it possible to avoid other encounters, whereas failure took them down side-paths that ate up valuable time and resources. The players were aware that the mind flayers' plans were underway, and that the longer the party took to resolve this situation, the more difficult the path forward would become.

I'm not going to post the full point-crawl write-up like I did with the secret entrance shrines, as I'm not terribly proud of using this method, but bits of it were good and I am fairly happy with the encounter design work. I will, however, post a summary of the point-crawl below the cut for those interested in what occurred.

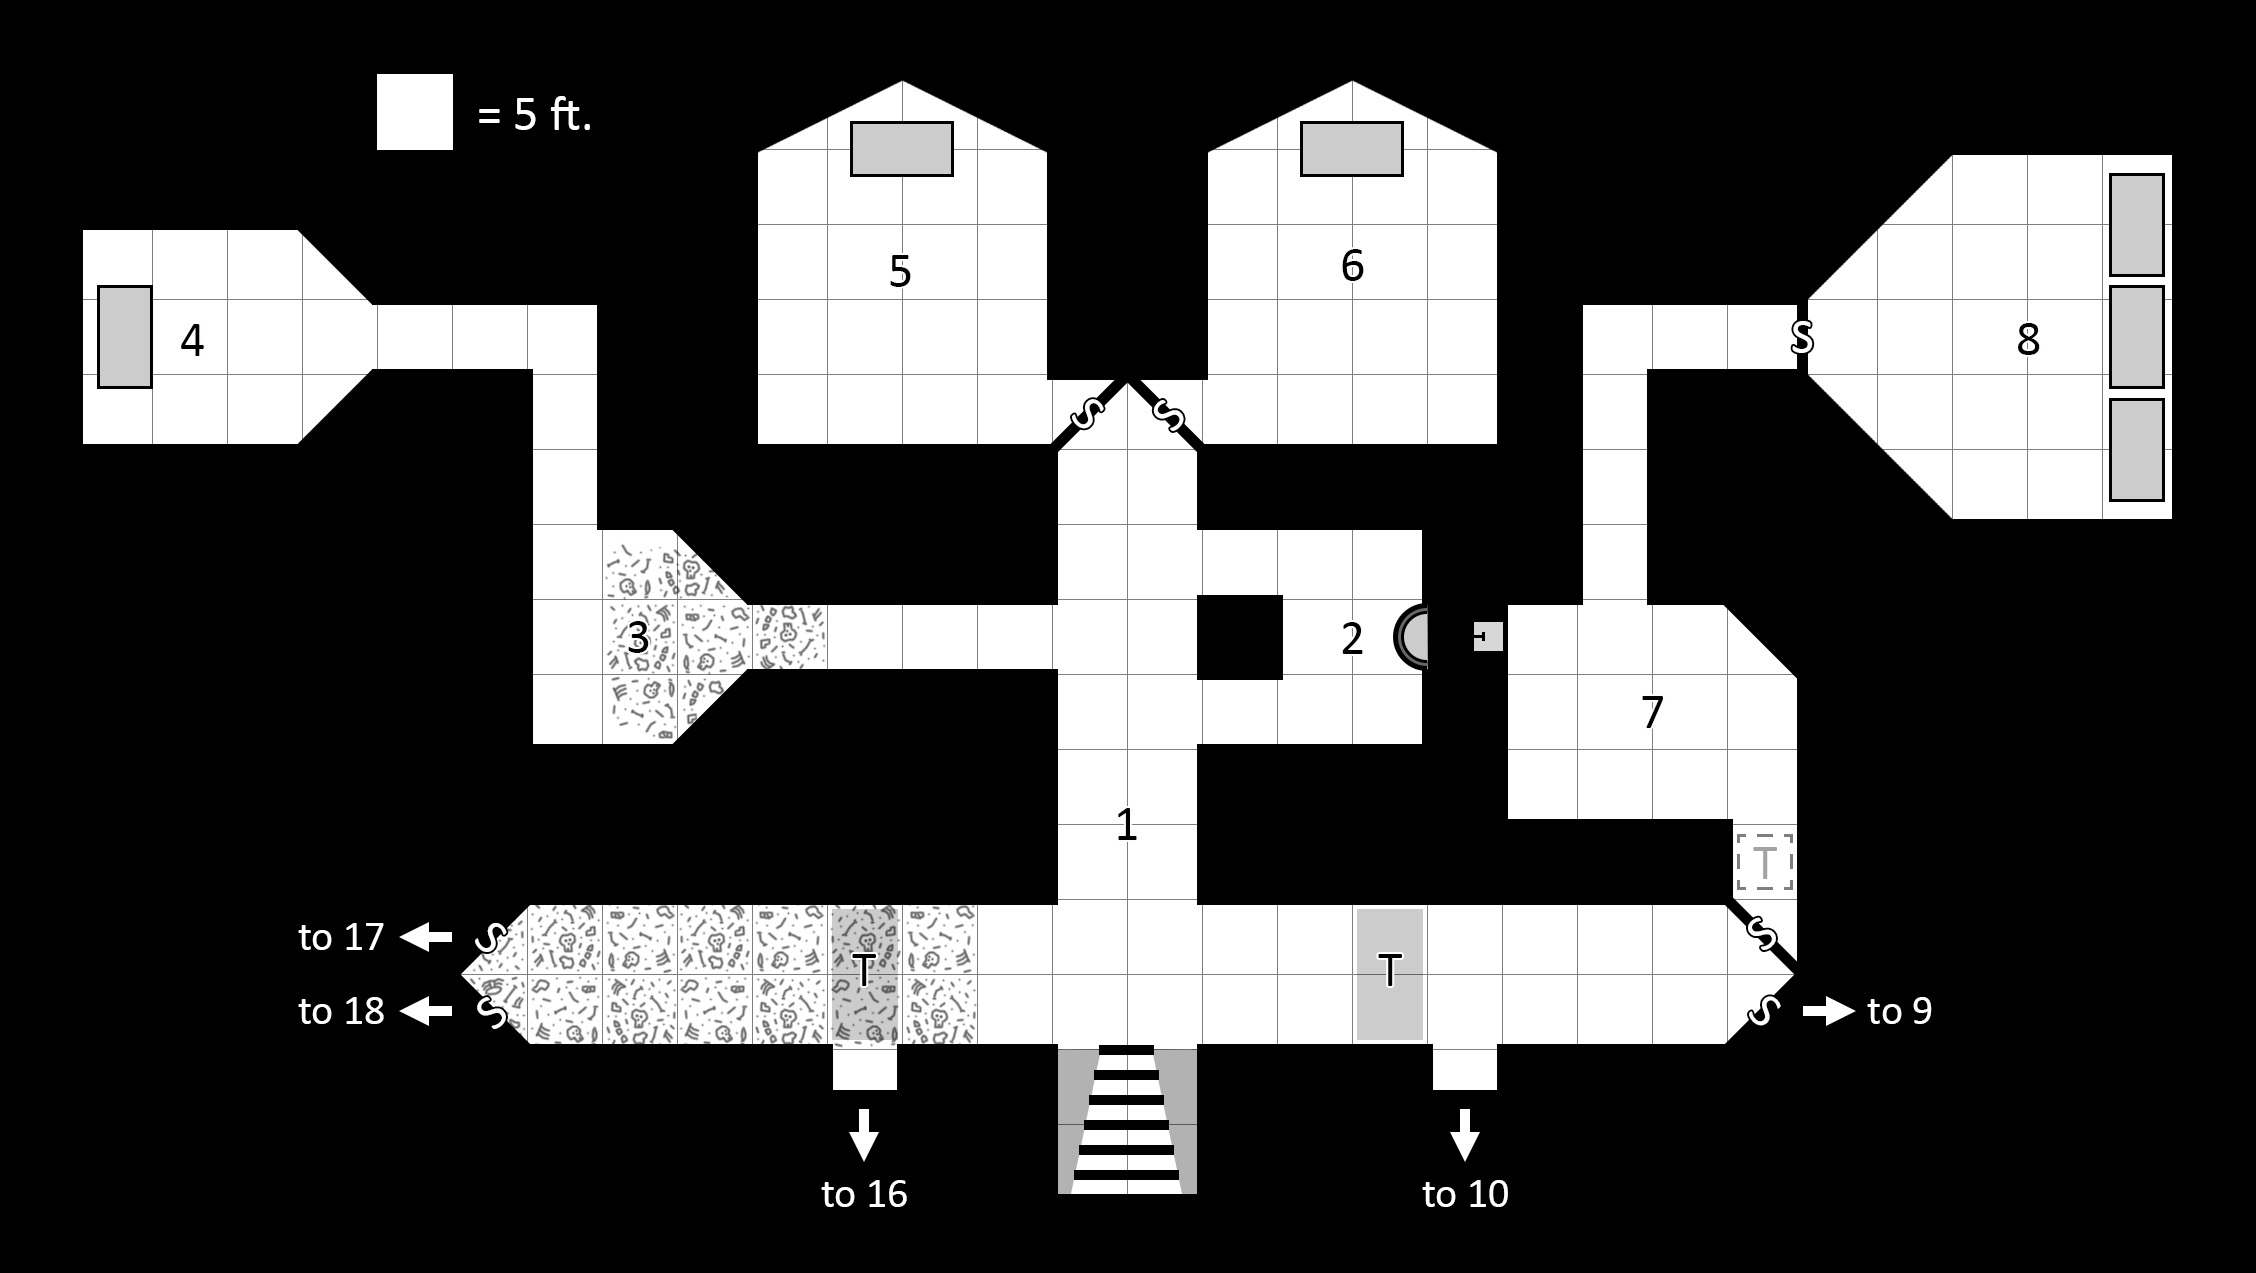
The following is the map and general key for the temple ruins. I'm also including links to a full-sized "clean" version of the map, as well as a version with an isometric grid. I'm extremely proud of this map and regret that I was only able to use it for a short period at the end of the campaign. I hope to repurpose it for a future site, but hopefully it will inspire others to make something of it as well. 

I built it as an homage to one of my fave AD&D modules: I1 Dwellers of the Forbidden City, as well as the superlative Caverns of Thracia by Jaquays (which I renamed as The Caverns of Eternal Night). In the beginning, I wasn't certain what would go in the Halls of the Ancient Ones, but when I retooled the map for the high-level group, I determined that it would be the extended lair for a nasty beholder, another holdover aberrant god of the ancestors of the hillmen who once lived here. It also fit the eye motif well, which was kind of a happy accident.

The Temple Ruins

>> Full-size "clean" version (no grid)

>> Isometric grid version (scale = 20x20-ft. squares)

Tuesday, April 9, 2024

The Temple of Oblivion – Part 2: The Secret Entrance

<< PART 1: The Temple Valley

The party learned of the existence of a secret entrance into the temple ravine from the cultists, but I left it up to the players to decide how they wanted to proceed. There were a number of obvious ways into the area, and by this point the players ranged in level from 7th to 9th, so they had the resources to try any number of approaches. The party had some additional info about the site they acquired during their previous adventures which, combined with the visual details they could see from the vantage hill, gave them a fairly good overview of what they would need to do.

They opted to try to find the secret entrance and avoid a frontal approach using either force or bluff. From the vantage hill, they headed north, winding through the gullies between the hills. They encountered swamp trolls in some flooded ruins, and then entered one of the main valleys to the northeast of the temple mound, passing into the zone of corruption.

They crossed the valley and began moving south toward the eastern face of the temple mound in search of the concealed stair. During this part of their exploration, they encountered a band of hillmen patrolling the valley. With the band was one of their shamans, who was already infected by a juvenile mind flayer. The levitating creature was being led along by ropes, and appeared to be psychically scanning the valley for intruders. Fortunately, the encounter distance was outside its detection and the party avoided the hillmen.

The party found the secret cliffside stair and ascended it, where they learned that they needed to "unlock" the secret entrance by performing a series of rituals in each of six separate shrines. They were ultimately successful, though they struggled in a few places. They also managed to avoid fighting the harpies in the aerie.

I created the image to the right as a vertical map for Roll20, which worked really well to convey the creepiness of the site and give a sense of scale for what was to come (1 square = 5 ft., both horizontally and vertically). The imagery of the façade depicts the ancient civilization's aberrant "gods": a mind flayer, a "frog-demon" (slaad), and an "evil eye" (a beholder, which wasn't immediately obvious to the party). 

Each of the shrines can be entered from the façade map, and contains a small puzzle complex that, when solved, releases one of six switches to open the main seal to the secret entrance. The individual shrines are described after the cut below.

As with Part 1, I've stripped out the 5e-specific monster stats and details (including specific saving throws and ability checks) from this write-up for a more generic presentation and easier adaptation if anyone wants to use this in your own campaign.

The Concealed Stair
Hidden among the foliage at the base of the eastern face of the temple mound is a winding switchback stair that rises precipitously up the steep, vine-shrouded hillside. Carved into the cliff at the top of the stair is a shrine complex which protects a secret, ritualistic entrance into the valley. Using this route to enter the temple ravine is not a simple matter, however.

Saturday, March 23, 2024

The Temple of Oblivion – Part 1: The Temple Valley

When I was bringing my first 5e campaign to a close, the PCs were trying to rid themselves of a curse they had acquired after finding and removing an evil idol from a warded vault deep beneath the earth (intending to have it destroyed). The idol depicted a tentacled, demonic figure that they could not rid themselves of—no matter what they did or where they tried to leave it, it always reappeared among their belongings.

Part of the curse revealed the party's location to sinister beings from beyond (mind flayers) who sent their minions to attempt to retrieve it. These minions included gnolls, frog-demons (slaad), and members of the Cult of Khoss. The cult misguidedly thought they could subvert the mind flayers to their cause, but soon found themselves under the thrall of the alien geniuses.

A faction of the cultists who remained free of the mind flayers' control made contact with the PCs and divulged that the mind flayers' base of operations (and the source of the idol's cursed power) lay within the Howling Hills of northwestern Remedios, among the ruins of an ancient civilization that once worshipped the mind flayers. The cultists provided the party with another piece of crucial information: The mind flayers already possessed two similar idols, but needed the party's third idol to open a portal to their beyond-realm, through which "something" would emerge to conquer this world.

Finally, the cultists gave the party directions to the site. The cultists' plan was to convince the party to go to the temple and do the dirty work of wiping out the mind flayers (or at least distracting them) while they freed their enthralled comrades and escaped the area. Whether the party succeeded or not was irrelevant to the cult (Glorious chaos!); they simply wanted to extract themselves from a situation that had gotten out of their control. This was the background for the campaign's grand finale.

Saturday, February 24, 2024

The Dolmen Tomb – Area 20: Chieftain's Crypt

More than a dozen ancient skeletons grasping bronze khopeshes and outfitted in lamellar armor and wicker shields are laid out on straw mats lining the dusty floor. Against the north wall sits a carved stone throne, upon which slumps the mummified body of an obviously-important warrior wearing a bejeweled iron crown. In his gnarled right hand, he clutches an exquisite battleaxe which glows softly in the darkness of the crypt. 

Sunday, February 18, 2024

The Dolmen Tomb – Area 19: Antechamber


A pair of 8-ft. high statues of coyote-headed men stand in alcoves on the east wall. Emplaced at chest-height on the west wall are four, 2-ft. sq. metal panels: one each of bronze, iron, silver, and gold (from north-to-south). Ancient bronze and copper excavation tools (picks, spades, augers, etc.) are stacked against the angled south walls, which show signs of long-halted digging work.

Friday, February 16, 2024

The Dolmen Tomb – Area 18: Slaves' Crypt

 
Dozens of ancient skeletons are laid out on straw mats lining the dusty floor.

  • Skeletons. These bodies (37 total) do not animate IN ANY WAY unless the tomb guardians in area 19 activate to repel intruders. Even if previously smashed, the bones will reform into brittle skeletons when that occurs.

<< Area 17: Slaves' Crypt

>> Area 18: Antechamber

Thursday, February 15, 2024

The Dolmen Tomb – Area 17: Slaves' Crypt

The chamber is empty save for dozens of straw mats lining the dusty floor.

  • The (30) brittle skeletons once interred here were released and destroyed by the tomb robbers (see area 1).

<< Area 16: False Secret Door

>> Area 18: Slaves' Crypt

Wednesday, February 14, 2024

The Dolmen Tomb – Area 16: False Secret Door


At the end of this seemingly dead-end passage is a deliberately-obvious “secret door” (anyone searching the west wall “discovers” a suspicious-looking panel automatically).

Monday, February 12, 2024

The Dolmen Tomb – Area 15: Champion's Crypt


Dozens of ancient skeletons are laid out on straw mats lining the floor of this crypt. A carved stone sarcophagus rests near the angled south walls. The stone lid is carved with ancient glyphs that tell the tale of Tiyamuzi—Champion of the Coyote Clan. Bloodoath-Keeper.

Sunday, February 11, 2024

The Dolmen Tomb – Area 14: Wise-woman's Crypt


Dozens of ancient skeletons are laid out on straw mats lining the floor of this dusty crypt. A profusion of jars rest on the floor against the east and west walls. A carved stone sarcophagus stands near the angled south walls. The lid is carved with ancient glyphs that name the interred as Ninu the Ageless—Wise-woman of the Coyote Clan. Outsider.

Tuesday, February 6, 2024

The Dolmen Tomb – Area 13: Trapped Hall


The walls, floor, and ceiling of this hall are covered with finely-worked carvings that depict pastoral/quasi-ceremonial scenes of beasts and hill-men.

Sunday, February 4, 2024

The Dolmen Tomb – Area 12: Shrine


A terracotta statue of a matronly woman sits cross-legged upon a raised (1-ft. high) dais on the south wall, and cradles a stone urn in her lap. The dais surrounding her is covered with dozens of unlit candles, wooden bowls and straw baskets filled with desiccated offerings, and two sealed clay jars. The room is filled with a fecund, earthy aroma and hints of floral perfume.

Friday, February 2, 2024

The Dolmen Tomb – Area 11: Processional Hall


The north wing of this chamber is lined with 5-ft. high arched alcoves (13 total). Seated cross-legged on the floor of each alcove is a robed and hooded figure, draped with dusty cobwebs. To the south is a wider antechamber with an elaborate arched exit, flanked by a pair of alcoves in which stand lamellar-armored skeletons holding bronze khopeshes and wicker shields. On the floor before the exit is a colorful mosaic which remains vivid even through the thick layer of dust.

Thursday, February 1, 2024

The Dolmen Tomb – Area 10: Altar Room


In the outer corridor (area 10a), a DC 18 (Perception) check spots the telltale seams of a secret panel on the south wall. The panel pushes inward, revealing a passage beyond. Dim light flickers from around the bend.

Sunday, January 28, 2024

The Dolmen Tomb – Area 8: Shaman's Crypt


The corridor from area 7 dead-ends in a crudely-rendered wall carving of a male figure with a coyote’s head addressing six coyotes. The figure wears a tight tunic and holds a staff capped with an orb of fire; with his other hand he points to the orb with his index finger hooked down.

Friday, January 26, 2024

The Dolmen Tomb – Area 7: Antechamber

More than a dozen ancient skeletons are laid out on straw mats lining the dusty floor. A 2-ft. sq. niche is set at chest height in the north corner of the west wall.

Thursday, January 25, 2024

The Dolmen Tomb – Area 6: Huntress' Crypt


Dozens of ancient skeletons are laid out on straw mats lining the dusty floor. A crudely-carved stone sarcophagus rests before the angled north walls. The lid of the sarcophagus is sealed with lead and carved with ancient glyphs that tell the tale of Saba—Wife of Chief Mesharsu of the Coyote Clan; Huntress of the Great Plain.

Wednesday, January 24, 2024

The Dolmen Tomb – Area 5: General's Crypt


Dozens of ancient skeletons are laid out on straw mats lining the dusty floor. A carved stone sarcophagus rests before the angled north walls. The lid of the sarcophagus is sealed with lead and carved with ancient glyphs that tell the tale of Ikakit—General of the Coyote Clan; Hero of the People.

Monday, January 22, 2024

The Dolmen Tomb – Area 4: Attendant's Crypt

The chamber is lit by torches as (4) tomb robbers work to pry open the lid of a stone sarcophagus. A sealed clay jar and a bronze coffer stand against the north wall. The tomb robbers crack the seal open just as the party arrives, releasing stale vapors when the lid shunts slightly to the side.

Aethelberd's Tomb for OSRIC Is Now Available at DriveThruRPG

My latest adventure is now live on DriveThru RPG . This started out as an adventure for my first 5e campaign, but the players failed to bite...